pictures

              shop                               facebook                                blog

Wednesday, January 29, 2020

snowflake cookies

I haven't seen snowflakes in years.
I love puffy white snow filling the sky on a cold winter's day.
However, that's not something that I can see on the Gulf of Mexico. So to celebrate a lovely Florida cold front, I thought I would make my soft gooey snowflake cookies.
This recipe is quick, easy and uses only 4 inexpensive ingredients.
 
 
All you will need is...
 
1 box of yellow cake mix
1 container of low fat Cool Whip
1 egg
powdered sugar
 
Preheat oven to 350 degrees.
 
 
The recipe requires one egg but you can substitute two egg whites for one whole egg if you want to reduce the fat content.
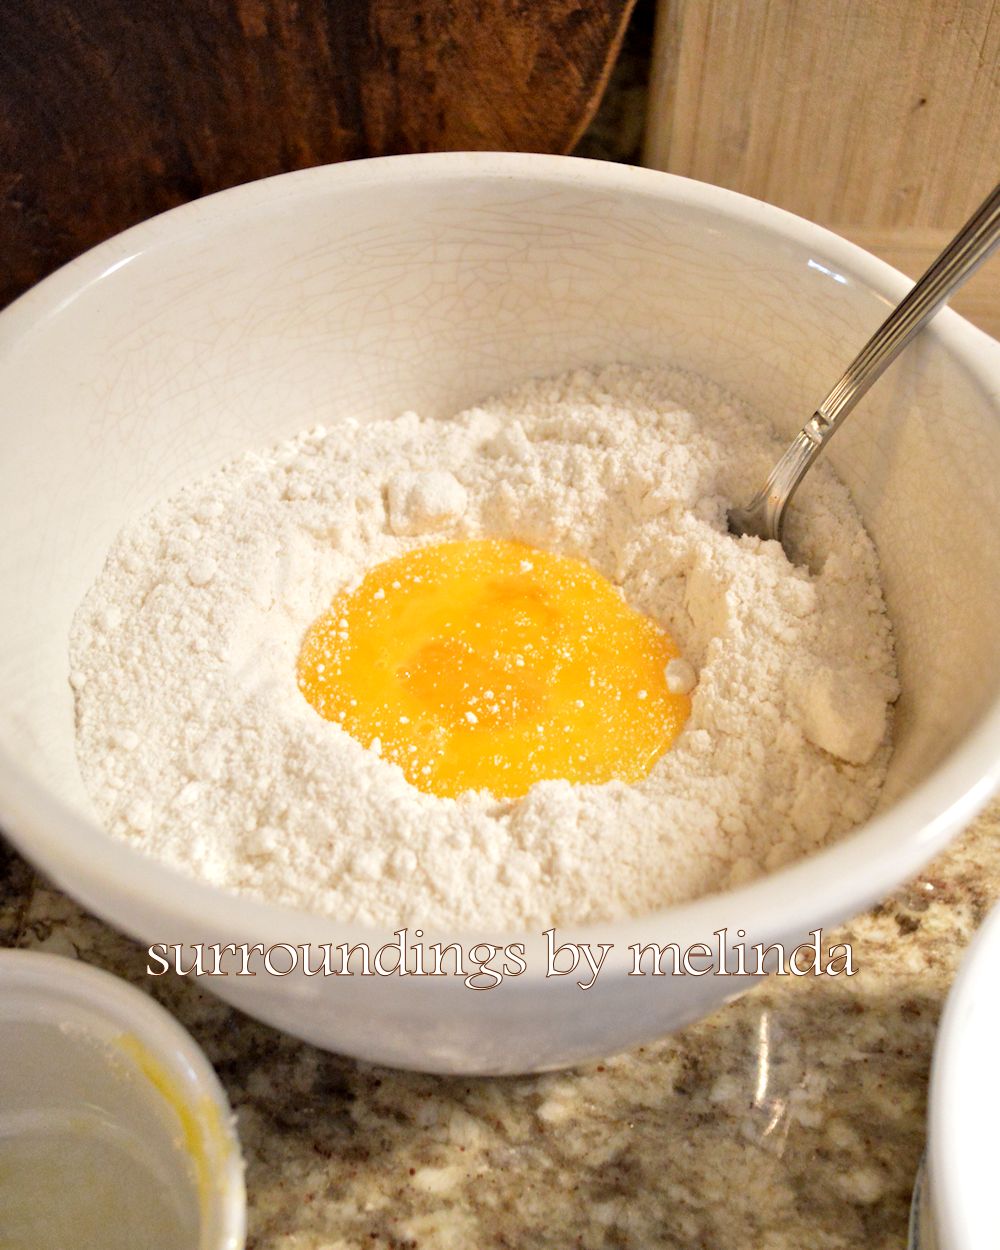
Crack the egg into a small ramekin to insure
shells don't fall into the mix.
Use a fork to gently mix the egg.
Pour the contents of the cake mix pouch into a mixing bowl.
Then stir in the egg.
 
 
Stir the Cool Whip to soften...


Add the softened Cool Whip into the cake and egg mixture.
 
 
Once incorporated the dough will be quite sticky.
 
 
Drop a tablespoon of dough into a container of powdered sugar. Cover completely and shake off excess sugar.
 
 
 Place each dough ball onto a very lightly greased
or nonstick cookie sheet.
 
 
Evenly space the dough balls and fill two cookie sheets.


Bake at 350 degrees for 10 minutes.
And like magic, the cookies come out looking like snowflakes!


Allow the cookies to sit on the tray for two minutes.
 
 
Then remove all the cookies and let them cool completely before putting them into an airtight food container.
 
 
Like with homemade cake,
the cookies are even better the second day!

Serve with cold milk or hot tea or coffee.
 
 
If made with two egg whites instead of one whole egg and fat free Cool Whip, each cookie has 1 gram of fat and only 40 calories. 
 
 
It is a yummy soft cookie that is the perfect winter (or anytime!) treat. It just might be the closest I will get to snowflakes for awhile!
Enjoy!
 

Friday, January 24, 2020

appreciating winter...at the beach

Having a grateful heart is so important. And I thank the good Lord above for my family, friends and the warm sun on my face every single day. Living in a beautiful place is a blessing and it is important to share those blessing with others. I love to enjoy this amazing place by having sunset beach picnics with those I love.
 
 
Start with a simple setting. I love all things vintage so an old folding table covered with an antique quilt, a bench or wooden folding chairs and pillows are a good start. Prepare for twilight by bringing a few candles and lanterns. Then load a wagon with refreshments and gorgeous flowers!
 
 
I also like to bring a few things like a sketchbook or painting supplies and a camera to capture the sunset.


Don't overthink the menu. Especially for a sunset picnic.
It doesn't have to be fancy or catered or even a full dinner.
 
 
 A sunset picnic can be as simple as a few special desserts and a wonderful pitcher of fresh lemonade. 

 
It's all about spending time with the people I love and enjoying the beauty the God has created.
 
 
And giving thanks of course!
Entertaining should be a stress-free process. It's about the people, places and having a grateful heart.
Thanks for visiting!


Monday, January 20, 2020

winter white garden

Hi all and Happy Monday!
I am inspired to post my Southern winter white surroundings.
Thinking about the North East covered in a blanket of white snow makes me shiver. So I thought I would share warm Southern winter white scenery with my Northern friends and family...
 
my garden
 
 
Brilliant trumpet like petunias

 
Spectacular iceberg roses

 
Bunches of beautiful hydrangeas

 
Stunning established fragrant jasmine

 
Trailing petunias

 
Alba roses

 
Pretty periwinkles

 
I even decorate with white shells in the garden..

 
I love winter whites inside in the too. I have paperwhite narcissus  blooming in all of my greenhouse windows!

 
As much as I love being warm in my garden all winter long, I do find myself getting homesick sometimes. I would be happy if anyone wants to share their white snowy surroundings with me!
Thanks for visiting!


Friday, January 17, 2020

warm memories

It sure is cold in many parts of the country right now. I try to remember to have a grateful heart every day that I live on the Gulf Coast of Florida and winter is nothing like my memories winters in Canada or West Virginia! Winter is now a time for me to look forward to cold fronts because cold fronts bring in the seashells not the snowflakes!
*You will notice some descriptive words are bold, these are the items I used and links to where you can find them.

 
If you aren't lucky enough to be at a beach right now, let me ask...do you have a random bag or box of shells you brought home from a summer vacation?
I thought I would post some seashell inspired projects and crafts for you to try this weekend in case you are cooped up in the house! I have collected shells my entire life and here are a few of my latest seashell projects...
 
 
I found this little wooden shelf "ladder" at a yard sale for 50 cents! It was very country, it had a warm stain and a heart cutout at the top. I painted it white and covered the shelves and heart cutout with an old map. I glued on the map using Mod Podge and then gave it several protective coats. Once dry, I used E6000 to attach shells to each shelf. 
 
 
For the next simple project, I created a shadow box by painting a wooden wine crate white and distressing it with sand paper. Then I glued a map to the inside (I used the Mod Podge again). Once dry, I affixed random shells and found objects to the box using the E6000 once again.

 
This charming old bottle has a crack so I turned it to the back and secured it in place with glue. The sea glass color adds a different texture to the shadow box.

 
I pick up bits of everything special at the beach: from sea whips to urchins to driftwood. You can add picture wire and hangers to the back to hang on a wall or simply display your shadow box on a shelf.

 
I love to make wreaths! So adding shells to a wreath seems like a natural fit. The base is a huck wreath I make by wiring twigs, wheat and millet to a wire wreath base.

 
Then I use my high temperature hot glue to add a thick border of shells, sand dollars, starfish and sea urchins around the center opening. Then I added some bits of natural green reindeer moss and tiny white silk flowers to add a natural soft touch to the finished wreath. This type of wreath needs to be kept indoors and out of direct sunlight. It could fade over time.

 
For a super cute and really easy project, paint an inexpensive lamp a fresh beach color using spray paint. Once dry, attach a beautiful shell and/or starfish to the lamp base. E6000 is the best adhesive for this project too. You could use hot glue, however, the shells could pop off over time.

 
I bought this lamp at a second hand shop. I sprayed it with Krylon Catalina Mist. Once dry, I dry brushed Kliz Dark Wax over the base and let dry. Finally, I attached a shell and starfish with E6000.

 
The next project is shell inspired. I painted and covered the seat of a garage sale chair (only $5).
First step is to remove the seat. Next, spray paint the entire chair with Rust-Oleum Vintage Teal satin paint.

 
Once dry, I sanded it lightly all over. Then I sprayed the entire chair with a light coat of matte white paint. I've used every brand and I like them all! Once this coat dried, I sanded the entire chair again allowing some blue to come through. Then I dry brushed some Waverly Celery matte chalk paint randomly in patches all over the chair. After everything was dry, I heavily sanded the natural wear spots like the corners and edges. I covered the seat with Waverly Coral Shell Spa fabric.

 
Whether you live near the beach or in the cold North, dig out some seashells and create something! Savor the memories from vacations past. It will warm your heart and remind you
of summer breezes under the sun.
Enjoy!


Tuesday, January 14, 2020

staying on track

Getting on track is one thing,
but staying on track is quite another.
One way to do this is to create a basic chore chart.
 
 
It goes back to those childhood memories of lists on the refrigerator or chore charts in the laundry room.
 
 
Good memories and a good idea as well.
Everyone is different and every list will be different too. I thought I would share my schedule in case it inspires you.
 
 
I try to work my favorite projects every other day
so I have things to look forward to.

 
CHORE CHART
 
Monday: clean the floors, shake out mats
Tuesday: water plants, clean the kitchen
Wednesday: clean the bathrooms
Thursday: laundry and pay the bills
Friday: dust the house and pick up clutter
Saturday: household or garden projects
Sunday: launder bedclothes, clothing overflow
 
 
I try to find ways to make may chores a bit more fun. For example, when I sit down to pay my bills I will take an extra few minutes to send a sweet note or card to someone special.

 
Although I like to keep to the chore chart, it's also important to have some duties that are preformed on a daily basis...
 
DAILY CHORES
 
*make the bed in the morning
*wipe down the bathroom counters
after getting ready
*sweep entry, mudroom or high
traffic areas after work
*disinfect kitchen counters after dinner
*de-clutter at the end of the day


Try to keep your Saturdays or Sundays open for household projects you enjoy. Whether it's cooking for the week ahead, crafting, sewing, remodeling or gardening (my all time favorite). We all need time to smile and decompress!
Housework can become overwhelming if it gets too far ahead of you. The key is to get on track and do your best to stay on track!
All it takes is a simple chore schedule.
Enjoy!