pictures

              shop                               facebook                                blog

Friday, January 3, 2020

winter gardening

Now that the holidays have passed, so has the chaos of the shopping, baking and entertaining. It's important to now decompress. My favorite way to do this is to garden.


I live in a climate that is suitable for year long gardening, but I would like to share a Zen gardening project that anyone can do no matter where you live...
Working with succulents.
 
 
I have succulents in my outdoor gardens, outdoor containers and indoor planters. I will simply take cuttings from some of my longer leggy plants...
 
 
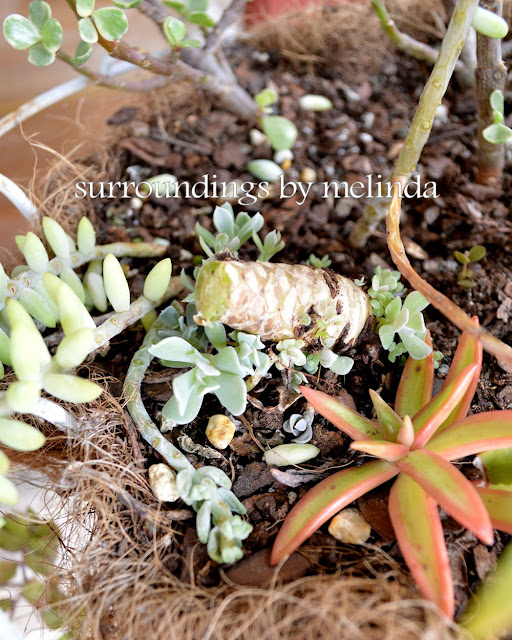
Mature stems can have multiple offshoots that can be separated into multiple new plants...

 
The offshoot needs to be cleanly cut from the main plant as close to the stem as possible.
 
 
Large succulents can grow long and leggy. I cut this one right above the new baby plants...
 
 
Each of these babies on the main stem now have the opportunity to grow to mature beautiful succulents.

 
Gently remove any dried leaves
from the stem of the newly cut succulent.

 
Give new stems a chance to harden over or callus.
This simply means the end of the stem needs to have a chance to dry for at least a week.

 
If you do not have mature plants to work with, visit your local garden center (or shop online) for starter succulents.
Click HERE to visit Walmart online: $12.79 for 10 cuttings.
 
 
Porous containers with a drainage hole, like a clean terra cotta pot, work best for succulent gardens. The plants need to have an environment that can drain well so the roots won't rot.

 
You can use store bought cactus soil or make your own mix...
3 parts potting soil
2 parts coarse clean sand
1 part perlite

 
Pack the soil lightly then create a starter hole. Place the dried stem of your cutting into the soil.

 
Continue to work all the way around the container leaving small spaces between each plant for growing room. Place succulents with trailing properties around the outside.  

 
Lightly and evenly water the plant and place the containers in a sunny window. Don't water again until the soil has completely dried out. The roots will take hold in no time at all. This is a peaceful and relaxing way to have a lovely gardening moment in the middle of a winter afternoon.
Enjoy...
 

Wednesday, January 1, 2020

the time has come...

It's been a year since I have been to my blog and about as long since I have visited any social media.

 
Over time I think I will be able to share more, but I will say that I needed time to heal and regain my strength.
 
 
I've been away from this desk long enough and I think it's high time to re-launch my blog. For those who have followed me throughout my years in my retail shops, on television and in magazines, you know I have been given the overly broad title of "lifestyle expert".
 
 
Far from an expert, unfortunately, I am a very happy homemaker and I love the domestic arts. I am going to start sharing once again...not just decorating, crafting and gardening ideas, but entertaining and cooking as well as make-up, clothing and wellness tips and ideas for ladies 40 and up (I'm way up).
Although I know I'm not a lifestyle expert, I would love to share my life and the old-fashioned style in which I live.
 
 
Thank you so much for visiting. I hope you will join me on this journey. I must say it feels nice to be back... 
 

Monday, December 24, 2018

white christmas

Sending warm wishes from my home to yours...
 
 
This is my Sanibel house decorated for Christmas...


I hope you have a wonderful Christmas
surrounded by all those you love!!!
My family is all in West Virginia and Pennsylvania but we will be together in spirit.


Friday, December 21, 2018

a stitch in time

I have loved quilts my entire life. The colors, the detail, the craftsmanship and the time worn texture. Quilts tell a story and document history. Each quilt is a treasure and a work of art. I have collected beautiful quilts for years, then I discovered a "new" classification of quilts known as cutter quilts. I saw a stack at a tag sale in WV many years ago. They cost next to nothing due to the horrible condition. The name, cutter, comes from the fact the only purpose for these damaged quilts is to cut them up for craft projects. I have piles of cutter quilts and I always have ideas for them, especially around the holidays.
 
 
I have made so many things out of my precious cutter quilts. Some have become gifts, some I have sold in my shops, many are proudly displayed in my home and others were featured in magazines. Here are a few of my Christmas favorites...
 
 
I make angels in several shapes and sizes. I keep the silhouette simple so the quilt can be appreciated. I don't hide the imperfections, I embrace them! The hair is fashioned out of yarn and the wings are doilies.

 
Santa is always a popular character.


And I have made many stockings...

 
...adorned with tiny Shiny Brites.

 
For those who believe antique quilts shouldn't be cut no matter the condition, all I can say is that giving old quilts new life allows them to be appreciated for years to come. Hopefully they will become tomorrow's heirlooms!


Wednesday, December 12, 2018

try this...

I wanted to add a little something to my last post. When it comes to making a holiday wreath, it becomes extra festive when you can make it interactive. Like providing something special for someone special!
 
 
I took the vintage Christmas cards I had selected for the wreath and made them into cones. I taped the edge to secure and wired them to the wreath form.

 
I filled the paper cones and cups with small individually wrapped candies.

 
When guests visit (or every time I walk past the wreath) you can reach in and have a sweet treat!

 
Fun right?
You can apply the same ideas to your Christmas tree. Give til it hurts...it's the holidays!!!


Monday, December 10, 2018

favorite things wreath

To make a "my favorite things wreath", I started with a simple artificial pine form on a wire base.
 
 
I used green florist wire to attach my items, like this precious gumdrop snowman, to the form.

 
I use wire instead of glue so I can take the wreath apart in the future and it won't damage the items.

 
Tea and demitasse cups are terrific for wreaths because it is easy to wire them to wreaths by the handles. 

 
I made tiny bird's nests out of strips of vintage floral fabric.

 
Vintage Shiny Brites always look terrific in wreaths!

 
And I love mixing unexpected items together, like miniature bottle brush trees, wooden spools of thread and buttons.

 
To attach handkerchiefs, gather the fabric in your hand, cinch with a rubber band and wire it onto the wreath form. 

 
Then I tucked in some colored pencils in coordinating colors.

 
The finished wreath is so pretty!

 
I mentioned in my last post that I was hesitant to make one of these wreaths for a magazine article. Just because I love them it doesn't mean that other people will. I was worried that it would be criticized for being silly or unsophisticated. But I pitched the idea to my editor and she gave me a chance. Little did I know that it would be one of my most popular articles! Readers even made "their favorite things wreaths" and sent pictures to the magazine. I received loads of emails too! Goes to show that it pays off to follow your heart...


Monday, December 3, 2018

a few of my favorite things

One of the most popular projects I ever developed for a magazine article was one I was very reluctant to write. I love to make things that are really sentimental. This project was based on the song lyrics... "these are a few of my favorite things".
 
I wanted to make a wreath made out of my favorite things. So the first thing I needed to do was come up with my list...
 
ONE
vintage figurine ornaments
 
 
TWO
tiny mittens
 
 
THREE
demitasse cups
 
 
FOUR
birds and nests
 
 
FIVE
glass ornaments
 
 
SIX
small bottle brush trees
 
 
SEVEN
holiday ephemera
 
 
EIGHT
handkerchiefs
 
 
NINE
pretty colored pencils
 
 
TEN
old buttons
 
 
The easy part was coming up with my top ten favorite things. Now it was time to turn this beautiful pile vintage treasures into a wreath. Stay tuned...! You'll see the finished project and I'll share why I was reluctant to put this in a magazine...